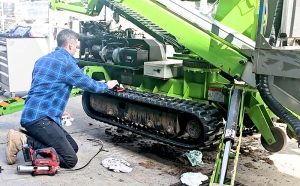
Track loaders are robust and adaptable machines, commonly utilised in construction, mining, and agriculture sectors. Regular maintenance is crucial to ensure their optimal operation. A key component of this maintenance is the ability to replace track loader tracks when they wear out or get damaged. This detailed guide will walk you through the steps to efficiently and safely change the tracks on a track loader.
Step 1 – COLLECT THE ESSENTIAL TOOLS AND EQUIPMENT
Before initiating the track replacement process, ensure all essential tools and safety gear are ready. This includes a 800mm flat-end pry bar, a bucket, a ratchet set, protective equipment such as gloves and glasses, a jack, jack stands or blocks, and a grease pump. It is also important to have the operator’s manual for your specific track loader model available, which provides detailed guidance for changing the tracks.
Step 2 – SECURE THE WORK AREA
For stable track replacement, position the track loader on a flat and solid surface. Make sure to cordon off the area effectively to prevent unauthorized access or the entry of unintended machinery into the hazardous zone.
Step 3 – LIFTING THE TRACK LOADER
Begin by securing the loader by engaging the parking brake and lowering any attachments to the ground. Use a jack to elevate the side of the machine that has the track needing replacement until the track is clear of the ground. Once lifted, Secure the machine in this position with suitable stands or blocks. Always have a spotter to help guide the lift and ensure all safety procedures are followed.
Step 4 – RELEASE THE PRESSURE ON THE IDLER WHEEL
Place a bucket under the grease fitting located on the frame. Use a socket and ratchet to remove the fitting, allowing the grease to drain into the bucket. Then release the pressure on the idler wheel located at the upper inside of the track.
Step 5 – RETRACTING THE IDLER WHEEL
Utilize a pry bar or a come along to shift the idler to its fully retracted position. Position the bar above the idler wheel and leverage it downwards and away from the track’s upper side.
Step 6 – REMOVE THE TRACK
With the track loader’s track fully loosened, use the pry bar to help lift and dislodge the track from the front idler. Once it is off the idler, carefully remove the track from the sprocket, ensuring it does not catch or become tangled with any other components.
Step 7 – INSTALL THE NEW TRACK
First, wrap the track around the sprocket and then around the idler, ensuring it is properly aligned beneath the track rollers. A pry bar can be used to assist in fitting the track into place but be cautious to avoid causing any damage to the track.
Step 8 – ADJUST TRACK TENSION
Reattach the grease fitting with a socket and ratchet, then adjust the track tension device using a grease pump until it reaches the desired tension. Check the operator’s manual for the appropriate tension setting for your specific track loader model.
Step 9 – MEASURING AND ADJUSTING TRACK SAG
Reattach the grease cylinder cap and measure the track sag by determining the distance from the inside edge of the track to the bottom edge of the center midroller.
Step 10 – LOWER THE TRACK LOADER
Now that the new track is installed, it’s time to safely lower the track loader. Start by ensuring the machine is still securely supported by the stands or blocks. Carefully remove the supports and gradually lower the machine using the jack, making sure the track remains clear and properly aligned. Once the track loader is back on the ground, disengage the jack completely. Finish by releasing the parking brake and raising any attachments from the ground. Always have a spotter assist with these steps to ensure all safety procedures are adhered to.
Perform a test run to verify that the newly installed track functions smoothly and without any problems.


